March 29th, 2004, began like any other morning. Sitting in the kitchen with a cup of tea, enjoying the morning crossword puzzle, tranquility reigned. Then, the unexpected happened.
Crraaackkk….BOWONG!
It was the unmistakable sound of a significant tree limb breaking, followed by a heavy thud. And it landed squarely on the roof of my 1959 Mercedes Benz Ponton 220S.
The sound was jarring, the sight even more so. For those who understand the passion of classic car ownership, particularly when it comes to a distinguished vehicle like a Mercedes Benz Ponton, the immediate reaction is visceral.
YEEEEEAAARRRRGHHH!!!!!!!
Anyone who has followed the journey of this particular 1959 Type 220S Mercedes Benz Ponton might recall my initial intentions. Like many vintage car enthusiasts, the dream was to acquire a car that was ready to drive and enjoy, not another project demanding endless hours of work in the garage. The Ponton was supposed to be “the one” – a car to drive, not wrench on.
Famous last words, right? That lasted all of two weeks. The Mercedes Benz Ponton, while indeed a lovely and drivable car, subtly revealed its character. The allure of ‘just driving’ quickly faded as minor imperfections and areas for improvement began to surface. Small fixes turned into a growing list of ‘restoration items’. You know how it goes – fixing one thing inevitably leads to another, spiraling into a cascade of interconnected tasks. Removing an emblem to fix something minor? Might as well repaint the whole panel. And so the restoration list grew, fueled by the intrinsic nature of a true car enthusiast.
Last fall, a blown head gasket manifested itself in the telltale sign of white smoke. The initial plan was simple: replace the gasket, address a few other minor issues, and enjoy the summer driving season. The ‘real’ work, the restoration, was earmarked for the winter months.
This is where the uninitiated might ask, “How does a head gasket replacement morph into a full restoration?” But for those of us in the classic car world, the question is rhetorical. There are those who understand the slippery slope of vintage car ownership, and those who are left scratching their heads, wondering why it took so long to consider a full restoration in the first place.
For those in the know, it’s a life of continuous improvement, an endless pursuit of perfection. We see potential projects where others see finished products. We are the eternally focused, driven by a passion that transcends mere ownership. To our friends, families, and perhaps the occasional therapist, we offer this:
We Are Not Obsessed. We Are Really, Really Focused!
So, understanding this mindset is crucial to comprehending the next phase of this Mercedes Benz Ponton restoration project. And thankfully, the unexpected tree damage had a silver lining.
The insurance settlement for the tree damage proved to be fair, even generous, providing a significant financial boost to offset the impending restoration costs. With the roof and hood now requiring extensive bodywork, a full restoration became inevitable. Bodywork necessitates paint, and fresh paint demands a refreshed interior. It’s the logical progression for any Mercedes Benz Ponton restoration.
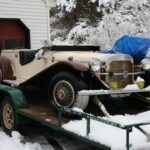
But wait, there’s more to this story. Serendipitously, another Mercedes Benz Ponton, a 220S residing in Arizona, came to my attention. It was described as suffering from “Restorus Interuptus,” a condition familiar to many classic car projects – stalled mid-restoration. However, it boasted excellent chrome, brightwork, and a remarkably straight body. The interior was described as ‘shot,’ but that detail was secondary to the treasure trove of parts it potentially represented. The initial thought was to acquire it as a parts car.
But fate, and perhaps a reluctance to dismantle a potentially salvageable classic, intervened. The owner was unwilling to part it out, but a conversation about a full purchase ensued. A price was agreed upon, and just like that, another Mercedes Benz Ponton was en route. And, almost as an afterthought, another hood was included – just in case.
Why the extra hood, you might ask? Well, there was also a line on a complete Webasto sunroof assembly, roof and pillars included, located in Pennsylvania. This coveted feature, a Webasto sunroof, had always been a desirable upgrade for my original Mercedes Benz Ponton. The opportunity to acquire one was too good to pass up.
So, the revised plan began to take shape. Instead of just parts, two complete Mercedes Benz Pontons now existed. The new direction was clear: restore both. The insurance money, combined with the donor car, and the Webasto roof, presented the opportunity to create not one, but two exceptional driving Pontons. Dismantling a restorable car for parts suddenly seemed wasteful. Besides, my initial Ponton, the ‘tree victim,’ was now deemed ‘not quite right’ – perhaps lacking in the project potential that a true restorer craves.
The ambitious, yet logical, plan was formulated: carefully remove the roof from the Arizona donor car, install the Webasto roof, restore its interior, rebuild the engine and drivetrain, and repaint the exterior. Then, turn attention to the original, damaged ’59 Ponton: remove its damaged roof, graft on the Arizona car’s original roof, install the extra hood, repaint, and finally, address all those items on the ever-growing restoration list. Simple, right?
Remember the mantra:
We Are Not Obsessed. We Are Really, Really Focused!
The “donor” Mercedes Benz Ponton arrived, albeit with a slight delay due to shipper engine trouble. Unloading the car in the middle of the night, in a downpour, added another layer of ‘fun’ to the project’s commencement.
Initial inspection of the Arizona car revealed it to be even better than described. The interior was indeed ‘toast’, but the body exceeded expectations. Rust was minimal, largely superficial with no significant penetration. These minor areas would be addressed later in the restoration process.
The plan to utilize the Arizona car as a donor for the Webasto roof conversion, while restoring both vehicles, still seemed viable. Cutting the roof off a car in such good condition felt almost wrong. However, research into Webasto roof retrofits indicated that a full roof transplant would be the most effective and factory-correct approach.
The first step in the restoration process was to tackle the Arizona car’s interior removal. Beginning with the seats, the rear seats were effortlessly removed by simply lifting the seat base. The upper rear seat section was equally straightforward, sliding easily out of its slots.
The front seats, described as ‘buckets,’ presented a slightly greater challenge. The entire seat and rail assembly needed to be removed as a unit. Each seat was secured by eight bolts, attaching the rail assemblies to the car’s floor.
These bolts were cleverly concealed. Accessing them required manipulating the seat to its extreme forward and rear positions. Pushing the seat forward exposed the rear bolts, while moving it rearward revealed the front bolts. Notably, four of the rear bolts also secured the spring mechanisms responsible for locking the seat position when the adjustment lever is engaged.
Before proceeding further, a crucial piece of advice for any restoration project, particularly for those less experienced with automotive puzzles. Meticulous documentation is paramount. This isn’t just about creating a log; it’s about preserving critical details that will become hazy over the long duration of a typical restoration. For a home hobbyist, a project like this can easily span a year or more. After disassembling an entire car, minute details are easily forgotten.
At a minimum, employ a rigorous bagging and tagging system for every nut, bolt, and small part – even those destined for replacement. Standard ziplock bags, clearly labeled with permanent markers, are invaluable. In some cases, individual items within a bag require separate tags to differentiate left from right, front and rear, or any other distinction relevant for reassembly.
The advent of digital photography is an absolute boon to the home restorer. In the pre-digital era, 35mm film photography was expensive and time-consuming. Waiting for film development often meant discovering a crucial photo was unusable, long after the opportunity to retake it had passed.
Digital cameras, readily accessible and affordable today, are indispensable restoration tools. High-resolution photos are far superior to even the best shop manuals and factory illustrations when it comes to refreshing your memory during reassembly. The cost of a digital camera will easily be recouped in saved film and development costs alone, making it a practically irreplaceable asset in any restoration project. Future you, during reassembly, will thank you profusely for the photographic record.
Returning to the disassembly, the removed seats were relocated to the basement for later attention. The next task was carpet removal. This proved straightforward – simply tearing out the existing carpeting. The Arizona Ponton had carpeting in both the front and rear, remnants of a previous, incomplete restoration. Decades of exposure to the elements had left it in poor condition.
Historically, Mercedes Benz Pontons were typically equipped with rubber matting in the front and optional rear carpet. The rubber matting was absent in this car, save for the door sills, likely removed during the previous restoration attempt. The original floor covering will be addressed during reassembly.
Aftermarket lap seat belts had been added to the car at some point, and were securely installed. These were simply unbolted, with the backing plates saved for potential reuse, although the webbing itself, degraded by years of exposure, was unlikely to be reinstalled.
With the carpet removed, the reason for the differing floor levels, front to rear, became apparent. The interior cabin floor is constructed as a beam-reinforced tub. Lateral cross braces provide structural rigidity. The rear floor forms the base of this tub structure. The front footwells, however, are elevated by custom-cut plywood or pressboard panels, resting on these cross braces, creating a raised floor for the front occupants.
Next on the agenda: interior wood trim and headliner removal. One of the distinguishing features of the Mercedes Benz Ponton sedans, compared to their two-door counterparts, is the use of solid wood trim, rather than veneer. Solid wood simplifies restoration, particularly when dealing with fading or scratching, as it is far more forgiving than thin veneer found in coupes and cabriolets.
Door wood trim removal was uncomplicated. Screws were removed, and the wood panels detached. Care was exercised due to the potential fragility of aged wood. However, in this case, salvaging the original door wood was unlikely. Sun, rain, and temperature fluctuations had severely warped and cracked all the pieces. These would be addressed later in the restoration. For now, screws were bagged, and the positions of felt damper pads were photographed.
Windscreen trim removal commenced with the rearview mirror. To remove the mirror, it’s grasped firmly and rotated 90 degrees upwards, towards the roof. This action, while seemingly forceful, is intentional. The mirror arm is designed with a ‘break-away’ snap fitting. Once rotated, a bracket with three trim screws is revealed. Removing the bracket allows the entire mirror assembly to be bagged for later use. Then, the trim screws are removed, allowing removal of the wood windscreen trim.
The windscreen wood trim ideally should come out in two pieces. However, age and dried glue often dictate otherwise. Each side of the windscreen trim is typically constructed from two straight pieces joined at the 90-degree bend with glue and wood biscuits. Over time, the glue often deteriorates. Gentle handling is crucial in this situation. The biscuits, small, fractured-looking pieces of wood, are essential for reassembly and should be carefully collected and bagged.
Mercedes Benz Ponton windscreen trim pieces after removal
Headliner removal was the next undertaking. Before tackling the headliner itself, the covers on the ‘B’ pillars (the vertical supports between the front and rear doors) needed to be removed. Several trim screws on each side secure these covers, which then detach with a gentle pull.
Prior to removing the headliner fabric, the handrails above the doors must be detached. Starting at the center support above the ‘B’ pillar, a recessed flat-head screw is located in the shaft. Removing this screw allows access to the chrome fittings at either end of the handrail. A flat screwdriver, gently inserted under these chrome fittings and twisted, reveals them to be trim caps, concealing the mounting screws beneath.
Once the handrails are removed, ensure the small screws for the center support are reinserted to prevent loss. The center support posts themselves are then unscrewed from the body and bagged.
Next, the front and rear interior lights were removed. The covers of these fixtures simply pop off with a flat-bladed screwdriver. Screws beneath the covers secure the light fixtures. Remove the screws, gently pull down on the fixture, and disconnect the wiring. Bag the lights and screws.
Removing the headliner fabric itself presented a perplexing challenge. In this case, due to its deteriorated condition, it was simply ripped and torn out. However, the original installation method seemed almost impossible to decipher. The fabric edges are secured under trim strips, which are themselves positioned beneath the liner. Accessing the screws for these strips requires removing the liner, but removing the liner (or installing a new one) seems to require removing these same screws – a classic Catch-22.
Mercedes Benz Ponton headliner trim strip detail
The factory installation of a Mercedes Benz Ponton headliner appears to be the work of mythical creatures, perhaps “Headliner Gnomes,” as no human hand could seemingly access the necessary points for installation and tensioning.
However, subsequent research revealed that human installation is indeed possible, without resorting to mythical assistance. Intact removal might also be feasible, a challenge for a later installment. The removed headliner was brittle, like dry parchment, possibly original to the car. The headliner bows still retained remnants of what appeared to be horsehair padding between the roof and bows.
Regardless of the removal method, careful attention should be paid to the steel headliner bows. These bows are removed by pushing them towards the rear of the car. They then pivot downwards 90 degrees, allowing them to be flexed and their tips removed from the support frame. Crucially, tag each bow in the order of removal. Each bow is specifically shaped for its position, and mixing them up will create significant headaches during headliner reinstallation.
An important safety note, overlooked earlier: when removing carpeting and especially the headliner, wearing a filter mask and safety glasses is strongly recommended. Decades of accumulated dust, mold, debris, and other particulate matter will be disturbed. The headliner bow pads often disintegrate into dust. Without protection, eye and respiratory irritation are highly likely, and a surprising amount of particulate matter can be inhaled without realizing it.
Another item to remove and set aside is the fabric-covered cardboard insert beneath the rear window. In this car, water damage had largely destroyed the cardboard, but it still served as a usable template.
The next phase of disassembly focused on the dashboard. As previously stated, personal disassembly is preferred for easier reassembly. However, in this case, the previous owner’s incomplete restoration attempt meant the dashboard was already partially disassembled. While the switches were in place, the instrument cluster and upper dash panel were loose.
The upper dash is constructed from two pieces of wood, originally glued together. Weathering had deteriorated the glue bond, separating the dash into two pieces. Salvageability remained uncertain. Being already loose, the proper disassembly steps were unclear, a puzzle for later resolution.
Mercedes Benz Ponton separated upper dashboard pieces
What was evident was that the upper dash needed to be loosened before switch removal. The lower dash panels also required removal. First, the heater control levers were detached. These simply pull straight out.
Starting on the passenger side, opening the glove box door revealed screws on the vertical edge closest to the passenger door. These screws secure the lower wood panel housing the heater controls. Removing these screws allowed the panel to detach. The outer edge of the panel utilizes a pin and socket bracket, meaning only inboard screws are required for its removal.
This process was repeated on the driver’s side. Removing both lower panels exposed the heater and air vent control mechanisms within the bulkhead.
Following this, the two glove box doors were removed. The larger passenger side and smaller driver’s side compartments each have doors. Initially, removing the doors with the hinges attached was attempted, but proved problematic. Each door hinge incorporates a spring-loaded mechanism that secures the door in both the open and closed positions. This, combined with the recessed hinge design, made door removal with the spring-mounted hinge attached difficult, if not impossible.
Next, the upper portion of the radio was removed. This was straightforward, secured by only two screws, suggesting it also had not been fully reinstalled previously. The upper radio section comprises the bakelite panel, speaker, and tuner, connected by wires to the power source located under the dash on the passenger side.
With the radio removed, clock removal was equally simple. Two nuts released the mounting bracket, freeing the clock. The three wires at the back of the clock were then detached.
The instrument cluster, while loose, remained wired and connected. The primary electrical connection is located under the cowl, near the wiper motor. Accessing it from under the hood, a rectangular connector needed to be disconnected. This brown bakelite connector resembles an oversized AC electrical plug and socket. Two small screws secure the two halves, requiring loosening before separation.
The oil pressure tube, speedo cable, and tripmeter cable also needed to be detached from the back of the gauge cluster. The oil pressure tube uses a small wrench for disconnection. The speedo cable detaches via a hand-turned knob. The tripmeter cable requires knob and collar removal, like a standard switch, allowing the cable and body to slide out of the dash.
The temperature sensor, in older systems like this Ponton, has a long lead running directly from the engine sensor to the back of the gauge. Detaching this lead from the gauge while the cluster is in the dash is not recommended. Instead, disconnecting the sensor at the engine and snaking the entire lead out through the dash is the preferred method.
It’s worth noting that the steering column was also loose. The exact way it integrates with the dash and instrument cluster, and its role in securing them, was unclear. With the column loose and the dash partially disassembled, attention turned to removing the dash switches.
Most switches are relatively easy to remove. Chrome and bakelite knobs simply unscrew, revealing a trim ring securing the switch body to the dash. These rings typically have two or four small holes at 180 or 90-degree intervals. Mercedes likely had a specialized tool (SST – Special Service Tool) for this purpose. Snap ring pliers with curved inserts proved effective for grasping and removing these rings.
Typical Mercedes Benz Ponton dash switch detail
Switch removal should be methodical and deliberate. If reusing the existing wiring harness, meticulous labeling and tagging of every switch and wire during removal is essential. Relying solely on wiring diagrams is insufficient. The headlight switch is a prime example, appearing to be a central junction for a significant portion of the wiring harness, with numerous wires connected to it. In this case, harness reuse was not planned. The insulation was brittle and cracking, necessitating replacement. Connecting a battery in its current state would likely result in significant electrical issues.
The headlight switch removal process differs slightly from the others. The knob does not unscrew from the assembly in the same manner. The trim ring, when unscrewed, secures the entire knob and shaft assembly to the switch body. Removing the trim ring allows the entire front half of the switch assembly to be removed from the body.
The final items for dashboard disassembly were the dash air vents. These cylindrical vents are held in place by a spring attached to a ‘C’ shaped wire fixture at the rear of the vent. Detaching the vent hose and the spring allows the vents to be removed.
With all switches, vents, and components removed, the upper dash could be fully detached, revealing the steel bulkhead behind it. Noting the location of all felt pads behind the dash is important for preventing squeaks and rattles during reassembly.
With the dashboard disassembled, the first day of the Mercedes Benz Ponton restoration project concluded. Tools were packed away, and the project log updated. The next installment promises to address the age-old question of removing trapped fingers from tight spaces, a humorous reference to the intricacies of automotive restoration. Until then, Happy Pontoning.
Created: April 25, 2004 © www.mbzponton.org