Mercedes-Benz vehicles are renowned for their engineering excellence, and even seemingly simple components like the hood mechanism are designed with precision. However, encountering difficulty opening your Mercedes hood can be a frustrating experience. While the primary keyword might be “How To Open Hood On Mercedes,” often the underlying issue stems from malfunctioning hood struts. This guide will walk you through troubleshooting common hood opening problems and provide a step-by-step approach to replacing your Mercedes hood struts, ensuring smooth and safe access to your engine compartment.
Understanding how your Mercedes hood operates is the first step in addressing any issues. Unlike older vehicles with a simple prop rod, modern Mercedes models often utilize gas-charged struts, also known as lift supports, to smoothly and effortlessly raise and hold the hood open. These struts are crucial for safety and convenience, preventing the hood from slamming shut and providing hands-free access for maintenance and inspections. Over time, these struts can wear out, losing their gas pressure and ability to support the weight of the hood. This degradation can manifest in several ways, making it difficult to open or keep your Mercedes hood open.
Common signs of failing Mercedes hood struts include:
- Hood feels heavy to lift: You notice increased resistance when opening the hood, and it requires more effort than usual.
- Hood struggles to stay open: The hood may open partially but then sag or refuse to stay fully raised, posing a safety hazard.
- Hood slams shut: In severe cases, worn struts can completely fail, causing the hood to drop suddenly and unexpectedly.
- Visible leaks or damage: Inspect the struts for any signs of fluid leaks, rust, or physical damage, which indicate they need replacement.
If you’re experiencing these issues, replacing your Mercedes hood struts is a straightforward DIY task that can save you time and money compared to dealership service. This guide is inspired by a hands-on project, focusing on using quality components for a lasting repair.
To undertake this DIY hood strut replacement, you’ll need a few readily available parts and tools. Based on a successful modification, here’s a recommended parts list focusing on compatibility and durability:
-
Hood Struts: For optimal performance, consider Lift Supports Depot PM3663N10S struts. These offer a good balance of extended length (16.11″), compressed length (9.84″), and force rating (90 pounds), suitable for many Mercedes models. It’s crucial to verify compatibility with your specific Mercedes model using Lift Supports Depot or your Mercedes parts catalog.
-
Ball Studs: You’ll need two 10mm ball studs with M8x1.25 threads to attach the struts to your Mercedes. Stainless steel options are recommended for corrosion resistance. Lift Supports Depot part number TOR3-13M8X125INX304 is a suitable choice.
-
Washers: M8 stainless steel washers are helpful to prevent the ball studs from scratching the paint during installation.
-
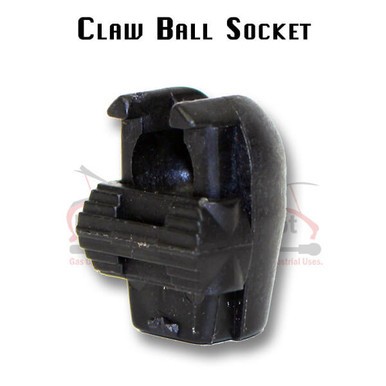
Optional Swivel Ball Sockets: For certain Mercedes models, particularly those where the ball studs are not parallel (like the EQS SUV where the top stud points outward and the bottom upwards), you might need 10mm close swivel angle claw ball sockets. These allow for a greater range of motion and prevent binding. Lift Supports Depot PC1144 is a compatible part.
Now, let’s proceed with the DIY replacement process:
-
Safety First: Ensure your Mercedes is parked on a level surface and the engine is cool. It’s advisable to have an assistant to help support the hood during the strut replacement.
-
Prop the Hood: Before removing any struts, securely prop the hood open. You can use a wooden dowel, a dedicated hood prop rod, or have your assistant hold the hood safely. Never rely solely on failing struts to hold the hood open.
-
Locate the Struts: Identify the hood struts on each side of your Mercedes hood. They are typically attached to the hood and the inner fender or frame using ball studs.
-
Detach the Old Struts: Most Mercedes hood struts use ball sockets that clip onto the ball studs. Carefully detach the old strut from the ball studs. This may involve using a small flathead screwdriver to gently pry the clip or socket open. Note the orientation of the struts before removal for easier installation of the new ones.
-
Install the New Ball Studs (If Necessary): If your existing ball studs are damaged or corroded, remove them and replace them with the new stainless steel ball studs and washers. Ensure they are securely tightened.
-
Attach the New Struts: Align the ball sockets of the new struts with the ball studs. Firmly press the sockets onto the studs until they click or snap into place. Ensure the struts are correctly oriented, matching the orientation of the old struts you noted earlier. If using swivel sockets, ensure they are positioned to allow for smooth hood movement.
-
Test the Hood Operation: Carefully remove the prop rod or have your assistant release the hood slowly. Test the hood’s opening and closing motion, ensuring it moves smoothly and stays open securely at its full height. If the hood is too difficult to close, or too forceful when opening, double-check the strut force rating and length are appropriate for your vehicle. As experienced in a real-world scenario, slightly shorter struts with a lower force rating might be preferable for easier operation.
-
Final Check: Once satisfied with the hood operation, double-check that all connections are secure and the struts are functioning correctly.
By following these steps and using the recommended parts, you can effectively address issues with opening your Mercedes hood and restore its smooth, reliable operation. Regularly inspecting your hood struts as part of your Mercedes maintenance routine can prevent unexpected failures and ensure safe and easy access to your engine bay.